Here's how to replace the camera on your Reach:
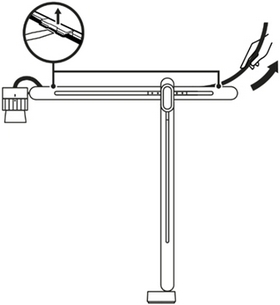
- Use a small flat tool, such as a flathead screwdriver, to release the cable clips located on top of the horizontal arm. Carefully insert the end of the tool into the gap between the clip and the side of the cable channel, then gently twist to unsnap the clip. Begin at the end furthest from the camera, and gently lift the cable from the channel, pulling upward until it is completely removed.
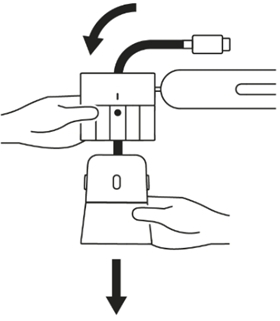
- To remove the camera from Reach, first hold the camera mount with one hand to keep it steady. Then with your other hand, gently grip the camera and pull it out of the holder. Finally, pull the camera and cable through the opening at the top of the holder until they are completely free of the Reach.
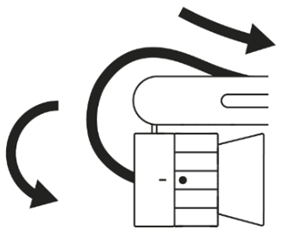
- Straighten the replacement camera's cable to remove any kinks. Insert the USB-C end of the cable through the camera holder and pull the rest of the cable through. Position the camera so that the yellow circle indicator is facing you, and the Logi logo is on the left side of it. Rotate the camera until this is achieved.
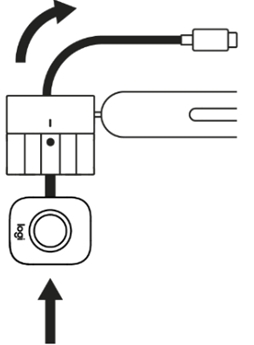
- Now that the camera is aligned properly to the indicator, slide the camera into the camera holder until you hear it click into place.
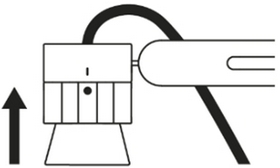
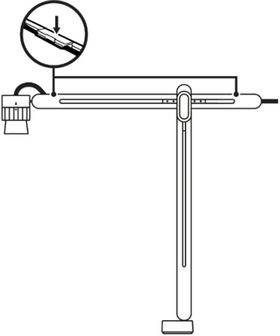
- Adjust the camera holder by rotating it until the camera is securely positioned downward in the "Stowed position." Route the cable along the cable channel at the top of the horizontal arm, ensuring it is firmly pressed into three cable clips to keep it aligned with the channel. With the camera in the stowed position, there should be adequate slack in the cable near the camera holder to enable the camera to rotate and maneuver freely in all directions.
- After the cable has been completely routed through the channel, fasten it in position using the two clips by pressing them down until you hear a click, indicating they are securely locked.
Ważna uwaga: Narzędzie do aktualizacji oprogramowania układowego nie jest już objęte wsparciem firmy Logitech ani nie jest przez nią utrzymywane. Zdecydowanie zalecamy korzystanie z aplikacji Logi Options+ w przypadku wspieranych urządzeń firmy Logitech. Chętnie służymy pomocą w tym okresie przejściowym.
Ważna uwaga: Oprogramowanie Logitech Preference Manager nie jest już objęte wsparciem firmy Logitech ani nie jest przez nią utrzymywane. Zdecydowanie zalecamy korzystanie z aplikacji Logi Options+ w przypadku wspieranych urządzeń firmy Logitech. Chętnie służymy pomocą w tym okresie przejściowym.
Ważna uwaga: Oprogramowanie Logitech Control Center nie jest już objęte wsparciem firmy Logitech ani nie jest przez nią utrzymywane. Zdecydowanie zalecamy korzystanie z aplikacji Logi Options+ w przypadku wspieranych urządzeń firmy Logitech. Chętnie służymy pomocą w tym okresie przejściowym.
Ważna uwaga: Oprogramowanie Logitech Connection Utility nie jest już objęte wsparciem firmy Logitech ani nie jest przez nią utrzymywane. Zdecydowanie zalecamy korzystanie z aplikacji Logi Options+ w przypadku wspieranych urządzeń firmy Logitech. Chętnie służymy pomocą w tym okresie przejściowym.
Ważna uwaga: Oprogramowanie Unifying nie jest już objęte wsparciem firmy Logitech ani nie jest przez nią utrzymywane. Zdecydowanie zalecamy korzystanie z aplikacji Logi Options+ w przypadku wspieranych urządzeń firmy Logitech. Chętnie służymy pomocą w tym okresie przejściowym.
Ważna uwaga: Oprogramowanie SetPoint nie jest już obsługiwane ani obsługiwane przez firmę Logitech. Zdecydowanie zalecamy korzystanie z aplikacji Logi Options+ w przypadku wspieranych urządzeń firmy Logitech. Chętnie służymy pomocą w tym okresie przejściowym.
Często zadawane pytania
Brak produktów dostępnych dla tej sekcji
Dla tego produktu nie są dostępne żadne pliki do pobrania
Brak plików do pobrania dla tej wersji.
Compatible Product
